SQL Server Traces

I would like to target in next posts on comparing Extended Events with Profiler Traces. In this post we will look at basic T-SQL routines creating and handling SQL Traces. You can use SQL Profile tool too. Open Management Studio -> Top menu -> Tools -> SQL Server Profiler.

Just few briefly words about SQL Traces. It is used to track SQL Server events triggered in system. Such a tool can be used to monitor SQL Server deadlock, performance tuning, auditing security area, etc.

Deeper comparation with extended events will be mentioned in one of my next posts.

As extended events SQL Server trace have few options:

Data column is an attribute of an event that can be collected in trace. Not all attributes are available for all events. Each event has its own set of attributes. Usefull queries for traces and their binding to columns bellow.

SELECT * FROM sys.trace_columns
SELECT * FROM sys.trace_event_bindings

Event is an object that is triggered in system and tracked by trace. The event contains data columns that can be collected and reported in trace.

SELECT * FROM sys.trace_events
SELECT * FROM sys.trace_categories

Trace is actually a collection of events and data returned by the Database Engine. To get info about traces and their options use following query.

SELECT * FROM sys.traces

Trace filters are predicates limiting collected events in a trace. To get info of filters set to concrete trace use following function with ID of trace as parameter.

SELECT * FROM sys.fn_trace_getfilterinfo(2)

To collect trace data by T-SQL you have to do few steps.

  1. create trace – to get its ID and define attributes like destination etc.
  2. set events to trace – events that will be collected by trace
  3. set filters if requested – to filter event data
  4. run/stop/remove trace

See detail info bellow.

To create trace use following code.

declare @TraceID int
declare @maxfilesize bigint
declare @rollOver    int = 2
declare @path NVARCHAR(100) = N'C:\Trace\Test'
set @maxfilesize = 1000000 
declare @maxfilecount INT=20
Exec @rc = sp_trace_create @TraceID output, 	@rollOver /*enable rollower*/, @path, @maxfilesize, NULL ,@maxfilecount
if (@rc != 0) goto error

The most important parametres are path, targeting destination of trace data. There are also possibilities to get data outputu to database table or use SQL server profiler application. In example above we use filesystem destination. @TraceID parameter gets ID of trace assigned by system. You use this ID when referencing trace in other routines. You can get ID from system table sys.traces too.

Other parameters defined in our examples are @maxfilesize – you define size of destination file in magabytes. If trace data achieve defined maxfilesize, the trace will be stopped.

In case that you would like to have trace data distributed to more files, because of faster quering, you can set rollover functionality as you can see on our example.  Value set for @rollOver  parameter tells the trace to establish new file one the previous one is full. Through this parameter you can set more options, you can see this link to get detail info.

By creating trace with this procedure we still not getting data. We have to set the trace which data should be collected. So use another one stored procedure to set this option.

declare @on bit
declare @eventID INT = 14
declare @TraceID INT = 2
set @on = 1
exec sp_trace_setevent @TraceID, @eventID, 10, @on
exec sp_trace_setevent @TraceID, @eventID, 3, @on
exec sp_trace_setevent @TraceID, @eventID, 11, @on
exec sp_trace_setevent @TraceID, @eventID, 7, @on
exec sp_trace_setevent @TraceID, @eventID, 8, @on
exec sp_trace_setevent @TraceID, @eventID, 12, @on
exec sp_trace_setevent @TraceID, @eventID, 14, @on
exec sp_trace_setevent @TraceID, @eventID, 35, @on

The first parameter @TraceID is used to set trace ID. @eventID is ID of event you can find in system table  sys.trace_events. In our case eventid 14 is set. It means Audit Login data are collected.

As next parameter you set columns, attributes you would like to collect. You can get list of columns with their ids from system table sys.trace_columns or from MSDN web here. For example on first row where sp_trace_setevent is executed we set 10 which means that application name attribute is collected.

The last parameter for sp_trace_setevent procedure is bit marker. All columns are disabled by default, by specifiying bit to 1 we enable the attribute to be collected.

To filter traces use stored procedure sp_trace_setfilter.

sp_trace_setfilter [ @traceid = ] trace_id   
          , [ @columnid = ] column_id  
          , [ @logical_operator = ] logical_operator  
          , [ @comparison_operator = ] comparison_operator  
          , [ @value = ]

Define @traceid to specify to which trace you would like to apply filter. By specifying @columnid you define on which attribute will be filter applied. @logical_operator means that OR (1), AND (0) filter logic will be applied. @comparison_operator (LIKE, equal, not equal, etc.) defines comparison_operator by its IDs you can find here . IN @value we define value to which should be column compared.

exec sp_trace_setfilter 2, 11, 0, 6,N'sa'

In filter above we set that on our trace monitoring Audit Login event, SA user will be filtered in the trace.  Trace=2, LoginName=11, 0 =AND operator, 6 = LIKE operator, N’sa’ value to be compared.

To handle trace activity, state, there is sp_trace_setstatus stored procedure implemented. See examples bellow.

exec sp_trace_setstatus 2, 0 /*stop trace*/
exec sp_trace_setstatus 2, 1 /*run trace*/
exec sp_trace_setstatus 2, 2 /*remove trace - has to be stoped first*/

Next time look at traces in more detail and compare them with Extended Events. Stay tuned!
SSRS snapshots

Snapshot are good for archiving reports, or to help report performance, pre-generate reports during night to have them prepared for users. There are few was you can create and access the Snapshot, manually or from Report Processing
Schedule and access it directly like live Report or from Report History. In this post I describe the native mode of Reporting Services, standard edition of SQL Server 2014. Since new versions of Reporting Services, 2O16, 2017 there come other compatibilities with web portal. Bellow are steps you can manage snapshots in Reporting Services Report Manager.

Let’s clarify Snapshots in Report history and Snapshots in report execution first.

Basically, when you create report Snapshot from Report Processing Option section you will not see it in Reporting Manager by default. The snapshot can be accessed when you set the Processing settings to be that Report will be rendered from Snapshot. In this scenario you than go to the Report like live rendering of the report but it is not processed by user it is processed from snapshot. You cannot change parameters, but the big advantage is that the Report processing is very fast. In case that more snapshots exist for one report, the last valid one is taken as source.

Report history gives user possibility to have accessible snapshots as they were created during time. It good be good if you would like to have backups of your reports or have comparation of data in reports during time. Report history can be accessed to users with standard roles which are not part of Administrators.

Both type of snapshots Report history and Processing Option can be created manually or based on its Schedule.

Let’s go to look at it closer.

At first, be aware of one important thing, you have to store data source credentials on the server. If not, you will get error message as on picture bellow.

Picture 1 – Report history

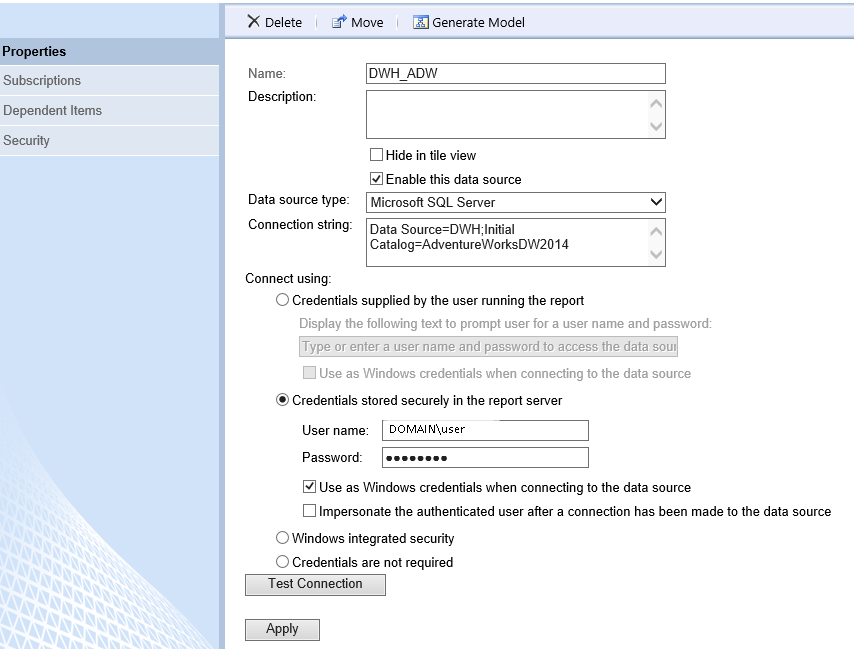
Following picture show how dataset should look like to allow you work with snapshots. Check Credentials stored securely in the report server and for windows credentials check Use as Windows credentials when connecting to the Data Source.

DataSource
Picture 2 – DataSource

To create Snapshot, we have to go to Report properties first. Go to Report properties by click on right arrow next to the Report name.

Report Item Name
Picture 3 – Report Item Name

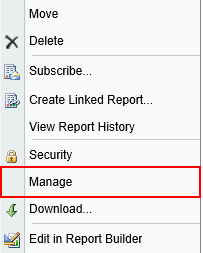
Go to Manage section from menu.

Menu Manage
Picture 4 – Menu Manage

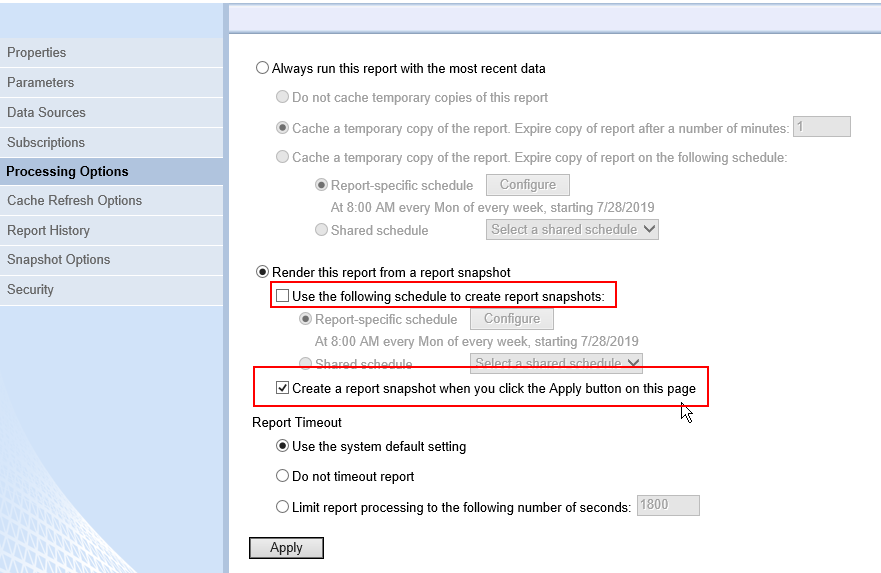
Go to Processing Options and click on Render this report from a report snapshot. By checking this option, the report will be rendered from snapshot next time. But in case you do this for first time and snapshot does not exists in database you have to click on Create a Report Snapshot when you click the Apply button on this page, to create the snapshot.

Processing Options
Picture 5 – Processing Options

If Snapshot will not be present in Report Server database, you get error when you try to run the report.

Snapshot
Picture 6 – Snapshot

When you check above mentioned option and click on apply button you can see snapshot  in database.

SELECT [CreatedDate]
,[QueryParams]
,[ExpirationDate]
,[PageCount]
,[HasDocMap]
,[PaginationMode]
,[ProcessingFlags]
FROM [ReportServer].[dbo].[SnapshotData] ORDER
BY createdDAte DESC

Picture 7 – Snapshot database

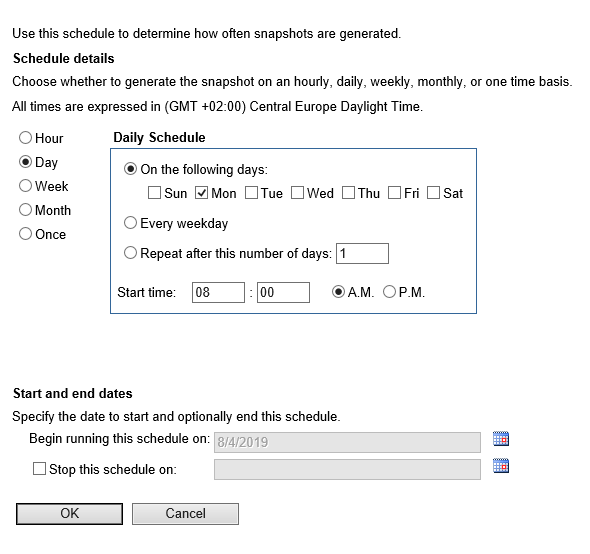
You can select the Schedule from predefined Shared Schedules (create in site settings) or define Report-specific schedule, to create schedule Report Snapshot. To set schedule, select parameters seen on picture bellow. Schedule periodicity (daily, Weekly, etc.), Start time, day list etc. You can set end day of the schedule too.

Schedule
Picture 8 – Schedule

Repeat steps described at the very beginning of this post and go to Report properties, to Report history section. Here you will not see any Snapshots since no Snapshot was generated to Snapshot History.

When you would like to add new Snapshots click on button above New Snapshot. When this button is not visible you have to set it first in Snapshot Options section (under Report History section in menu).

Report history
Picture 9 – Report history

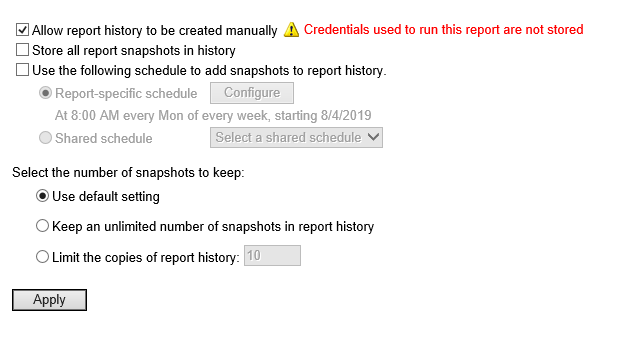
In Report Snapshot Options you can allow above mentioned button for adding Snapshots visible.

Snapshot Options
Picture 10 – Snapshot Options

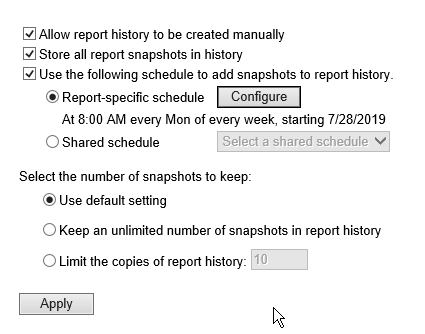
Let’s try check and uncheck Allow report history to be created manually. When unchecked you have no possibility to create snapshot in Report History manually. See picture bellow.

Report history
Picture 11 – Report history

Store all report Snapshots in history enable functionality when each report Snapshot will be visible in Report History. When we would go at the beginning of this post and create Snapshot through Report Processing Options, we could see created snapshot in Report History.

Use the following schedule to add snapshots to report history will create new Snapshot visible in Report History based on defined Schedule.

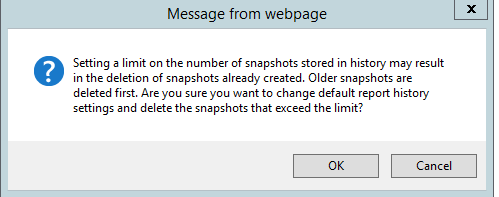
In this section you can limit number of stored Snapshots. If any already exists system warns you that some of them could be deleted already.

Message
Picture 12 – Message

More detailed info could be found here:
https://bit.ly/2KfMpTx

SSRS action

Action is very powerful functionality of reporting services. Action redirect you to external report or within the same report you are working with. You can realize with this functionality lots of scenarios with your reporting solution.

  • Drill down actions
  • Link to external resources
  • Navigation within report
  • Linking reports
  • Interactive user actions
  • Etc.

Action functionality support most of SSRS components.

There are 3 type of actions supported by SSRS.

  • Go to report will be used in this post, you specify report you would like to redirect to and parameters you would like to transfer to that report and their values (it can be report item, parameter, expression)
    • You can use relative path definition for report ../parentpath/myreport or full path /reportserver/path/myreport
  • Go to bookmark this realize navigation within the report. You define to which bookmark report go to by clicking on the Action. Bookmark can be any report item within the Report. You specify it in Properties pane, bookmark section.
  • Go to url used to link with external resources. But you can refer Report Server URL too. See post

More info here https://bit.ly/2TamgZ5

GOAL

In this post I will use action to filter data with Region Code by click on textbox item of Region Code group.

Let’s modify Report dataset to get CountryRegionCode as key, that will be transferred to Region Code parameter.

SET ANSI_NULLS ON
GO
SET QUOTED_IDENTIFIER ON
GO
ALTER PROCEDURE [dbo].[GETData]

@OrderDateKey INT , @OrderDateKey2 INT,
@CountryRegion VARCHAR(2),
@Province VARCHAR(MAX)

AS 
SELECT
  DimCustomer.FirstName
  ,DimCustomer.LastName
  ,DimCustomer.MiddleName
  ,DimCustomer.Gender
  ,DimCustomer.AddressLine1
  ,SUM(FactInternetSales.SalesAmount) AS Sum_SalesAmount
  ,SUM(FactInternetSales.OrderQuantity) AS Sum_OrderQuantity
  ,DimGeography.City
  ,DimGeography.StateProvinceName
  ,DimGeography.EnglishCountryRegionName
  ,DimGeography.CountryRegionCode
FROM
  DimCustomer
  INNER JOIN DimGeography
    ON DimCustomer.GeographyKey = DimGeography.GeographyKey
  INNER JOIN FactInternetSales
    ON DimCustomer.CustomerKey = FactInternetSales.CustomerKey
  JOIN dbo.SplitString(@Province,';') tmp ON tmp.Element  =DimGeography.StateProvinceCode
WHERE
  FactInternetSales.OrderDateKey >= @OrderDateKey
  AND FactInternetSales.OrderDateKey <= @OrderDateKey2
 
  AND ISNULL(@CountryRegion ,DimGeography.CountryRegionCode )= DimGeography.CountryRegionCode
  
GROUP BY
  DimCustomer.FirstName
  ,DimCustomer.LastName
  ,DimCustomer.MiddleName
  ,DimCustomer.Gender
  ,DimCustomer.AddressLine1
  ,DimGeography.City
  ,DimGeography.StateProvinceName
  ,DimGeography.EnglishCountryRegionName
  

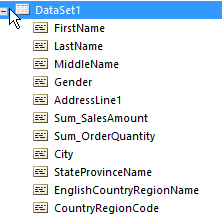
New report item was added to dataset.

Dataset
Picture 1 – Dataset

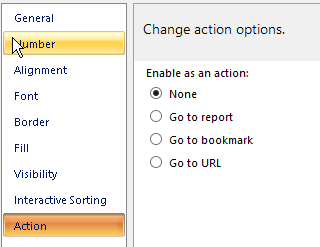
Right click on Tablix textbox RegionCode.

Action
Picture 2 – Action

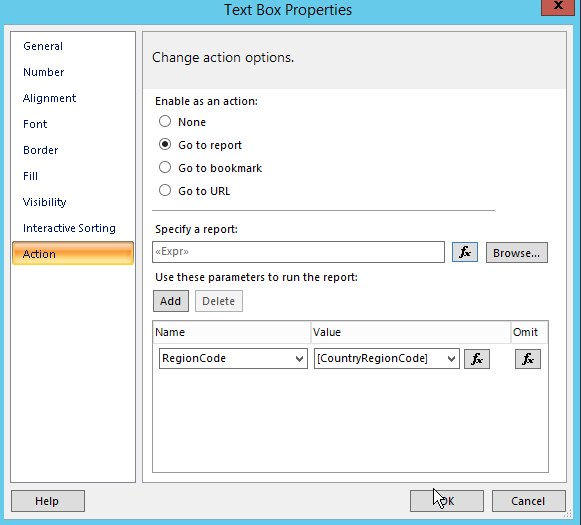
Check Go to report item and put bellow mentioned expression to Specify a report: textbox.

=Globals!ReportFolder+"/"+Globals!ReportName

The expression uses build in items, referencing the report by itself. Globals!ReportFolder.Value to get report path of recent report and Globals!ReportName.Vlaue to get recent report name. Advantage is that if we would change the name of the report or the location within ReportServer the Action link will not be corrupted.

In Parameter section lets define RegionCode parameter and select CountryRegionCode item from the Report Tablix. There is no need to define other parameters since they have its default values. In case the target report would not have default parameter values and the parameters will not support null or empty value, the target report will not be rendered by click on the Action item. It informs user that he should fill values to parameters first.

On the picture bellow you can see final settings of the Action properties.

TextBox Properties
Picture 3 – TextBox Properties

On the picture above you can see Omit button next to the Parameter definition. It allows you to define if the Parameter would be omitted or not.

Expression of Specify a report textbox, see picture bellow.

Expression
Picture 4 – Expression

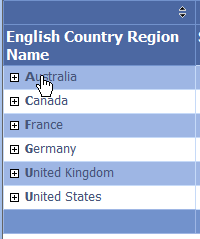
Now let’s try our solution. By click on English Country Region Name, you filter dataset by the item you click on.

English Country Region Name
Picture 5 – English Country Region Name

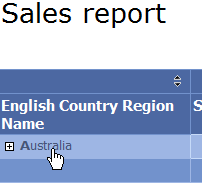
Filtered data.

Filtered data
Picture 6 – Filtered data

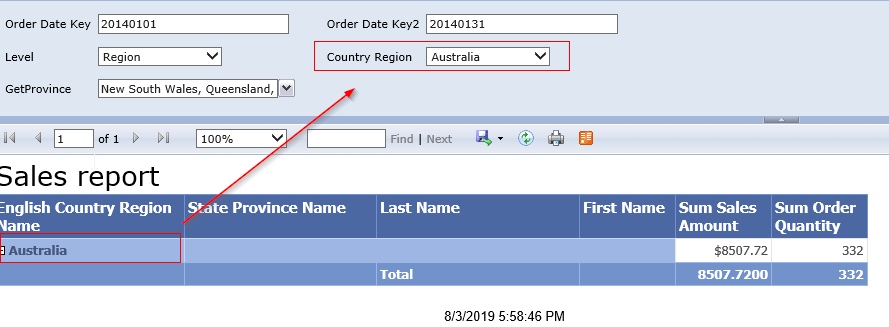
See that value from Report Item was transferred to Parameter through Action.

Filtered Sales Report
Picture 7 – Filtered Sales Report

In next post I would prepare other scenarios that could be handled by Report Action. Stay tuned.