SSRS action

Action is very powerful functionality of reporting services. Action redirect you to external report or within the same report you are working with. You can realize with this functionality lots of scenarios with your reporting solution.

  • Drill down actions
  • Link to external resources
  • Navigation within report
  • Linking reports
  • Interactive user actions
  • Etc.

Action functionality support most of SSRS components.

There are 3 type of actions supported by SSRS.

  • Go to report will be used in this post, you specify report you would like to redirect to and parameters you would like to transfer to that report and their values (it can be report item, parameter, expression)
    • You can use relative path definition for report ../parentpath/myreport or full path /reportserver/path/myreport
  • Go to bookmark this realize navigation within the report. You define to which bookmark report go to by clicking on the Action. Bookmark can be any report item within the Report. You specify it in Properties pane, bookmark section.
  • Go to url used to link with external resources. But you can refer Report Server URL too. See post

More info here https://bit.ly/2TamgZ5

GOAL

In this post I will use action to filter data with Region Code by click on textbox item of Region Code group.

Let’s modify Report dataset to get CountryRegionCode as key, that will be transferred to Region Code parameter.

SET ANSI_NULLS ON
GO
SET QUOTED_IDENTIFIER ON
GO
ALTER PROCEDURE [dbo].[GETData]

@OrderDateKey INT , @OrderDateKey2 INT,
@CountryRegion VARCHAR(2),
@Province VARCHAR(MAX)

AS 
SELECT
  DimCustomer.FirstName
  ,DimCustomer.LastName
  ,DimCustomer.MiddleName
  ,DimCustomer.Gender
  ,DimCustomer.AddressLine1
  ,SUM(FactInternetSales.SalesAmount) AS Sum_SalesAmount
  ,SUM(FactInternetSales.OrderQuantity) AS Sum_OrderQuantity
  ,DimGeography.City
  ,DimGeography.StateProvinceName
  ,DimGeography.EnglishCountryRegionName
  ,DimGeography.CountryRegionCode
FROM
  DimCustomer
  INNER JOIN DimGeography
    ON DimCustomer.GeographyKey = DimGeography.GeographyKey
  INNER JOIN FactInternetSales
    ON DimCustomer.CustomerKey = FactInternetSales.CustomerKey
  JOIN dbo.SplitString(@Province,';') tmp ON tmp.Element  =DimGeography.StateProvinceCode
WHERE
  FactInternetSales.OrderDateKey >= @OrderDateKey
  AND FactInternetSales.OrderDateKey <= @OrderDateKey2
 
  AND ISNULL(@CountryRegion ,DimGeography.CountryRegionCode )= DimGeography.CountryRegionCode
  
GROUP BY
  DimCustomer.FirstName
  ,DimCustomer.LastName
  ,DimCustomer.MiddleName
  ,DimCustomer.Gender
  ,DimCustomer.AddressLine1
  ,DimGeography.City
  ,DimGeography.StateProvinceName
  ,DimGeography.EnglishCountryRegionName
  

New report item was added to dataset.
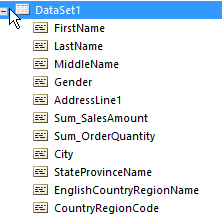
Dataset
Picture 1 – Dataset

Right click on Tablix textbox RegionCode.
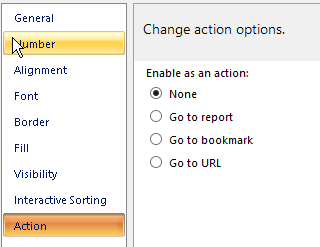
Action
Picture 2 – Action

Check Go to report item and put bellow mentioned expression to Specify a report: textbox.

=Globals!ReportFolder+"/"+Globals!ReportName

The expression uses build in items, referencing the report by itself. Globals!ReportFolder.Value to get report path of recent report and Globals!ReportName.Vlaue to get recent report name. Advantage is that if we would change the name of the report or the location within ReportServer the Action link will not be corrupted.

In Parameter section lets define RegionCode parameter and select CountryRegionCode item from the Report Tablix. There is no need to define other parameters since they have its default values. In case the target report would not have default parameter values and the parameters will not support null or empty value, the target report will not be rendered by click on the Action item. It informs user that he should fill values to parameters first.

On the picture bellow you can see final settings of the Action properties.
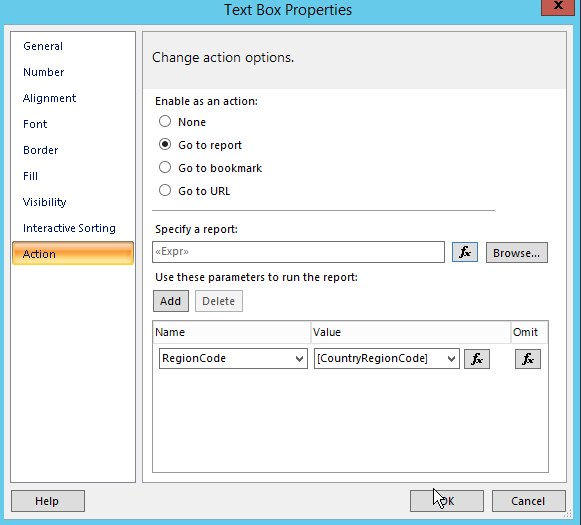
TextBox Properties
Picture 3 – TextBox Properties

On the picture above you can see Omit button next to the Parameter definition. It allows you to define if the Parameter would be omitted or not.

Expression of Specify a report textbox, see picture bellow.

Expression
Picture 4 – Expression

Now let’s try our solution. By click on English Country Region Name, you filter dataset by the item you click on.
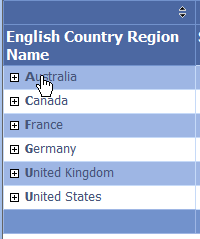
English Country Region Name
Picture 5 – English Country Region Name

Filtered data.

Filtered data
Picture 6 – Filtered data

See that value from Report Item was transferred to Parameter through Action.
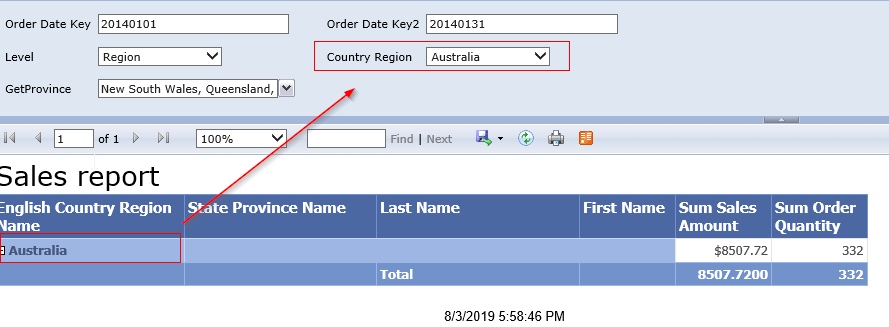
Filtered Sales Report
Picture 7 – Filtered Sales Report

In next post I would prepare other scenarios that could be handled by Report Action. Stay tuned.
SSRS connect to web service

IIn most of scenarios I realized projects that report Data Sources connect to MS SQL database or to Analysis Services cubes. But reporting services provide you with possibility to connect to more data source types. In this post I would like to show you how to connect with report to Web Service and visualise data. We do not need to developed Web Service for this sample we will use the Reporting Services Web Service. Let’s suppose that we would like to visualise data in Reporting Services Repository.

It can be implemented in few ways. We can use for this task Reporting Services database for example but for our purposes we will use Reporting Services Web Service.

Goal

Create dataset returning data regarding Reporting Services Report Manager directories and reports.

Open Report Builder and create new file
or Microsoft
Visual Studio with Data Tools, create new project and add new Reporting Services report.

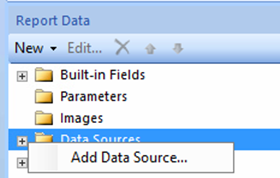
Go to Report Data pane, Data Sources section, right click and select Add Data Source.

Add Data Source
Picture 1 – Add Data Source

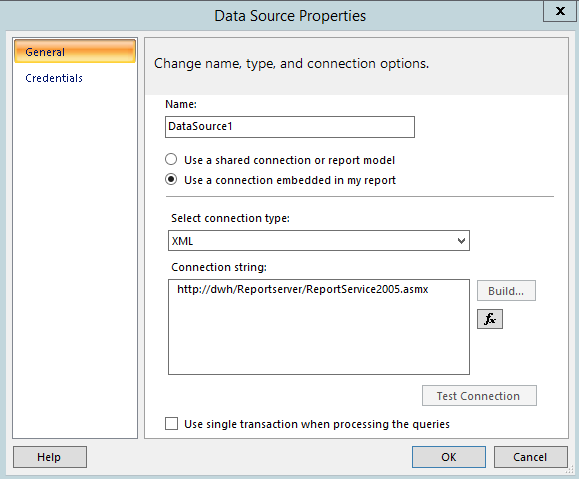
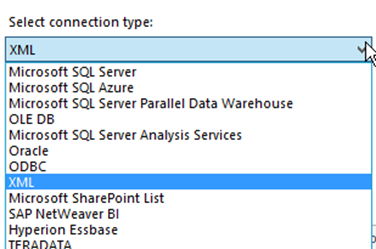
When Data Source Properties window appears, choose XML in Select connection type select box.

Connection Type
Picture 2 – Connection Type

In Data Source Properties dialog box put Connection string with URL address of your Reporting Services Web Service Endpoint. In my case I will use ReportService2005.asmx.

Data Source Properties
Picture 3 – Data Source Properties

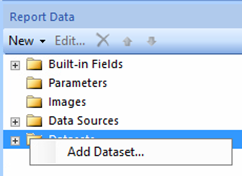
Create New dataset, select your created Data source DataSource1.

Add Dataset
Picture 4 – Add Dataset

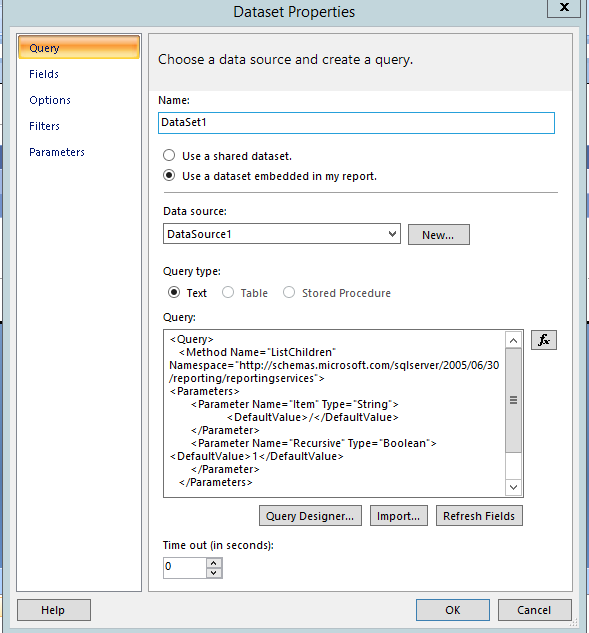
Put following code to Query text area.

<Query>
<Method Name="ListChildren"
Namespace="http://schemas.microsoft.com/sqlserver/2005/06/30/reporting/reportingservices">
<Parameters>
<Parameter Name="Item" Type="String">
     <DefaultValue>/</DefaultValue>
</Parameter>
<Parameter Name="Recursive" Type="Boolean">
<DefaultValue>1</DefaultValue>
</Parameter>
</Parameters>
</Method>
<ElementPath IgnoreNamespaces="true">*</ElementPath>
</Query>

If we look at the code above, we can see that we need to specify method name and its parameters. Everything you need you can find you put URL of We Service Endpoint to your browser. There you can find all methods the web service supports. The code mentioned above is syntax used for Report XML Data Sources. Find more info on the web https://bit.ly/2XvdCWB.

In our case we use Listchildren method which expects two parameters. Item – parent item, the method starts to list, and Recursive specifying you would like to list all its parents recursively. Dataset Properties pane should look like on picture bellow.

Add Dataset Properties
Picture 5 – Add Dataset Properties

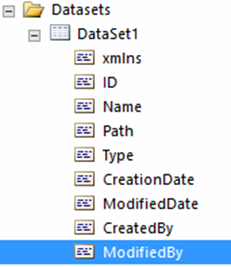
Voila and we can see items in our dataset. You can link the dataset with the Tablix of your report. As you can see web service gives us information regarding Name and Path of a report or when and by whom was the report created or modified.

Dataset Fields
Picture 6 – Dataset Fields

In next post I will implement recursive Tablix report with the dataset created in this post. Stay tuned.


Expand collapse groups

Expand, collapse functionality is nice feature of Reporting Services. In this post we use this functionality in connection with Tablix component. Be aware that more SSRS components support this functionality and it is good approach how to make reports and dashboards more user-friendly. It’s also a way how to make top to bottom analysis, since user can get data from totals to details by few clicks.

For practice you can use any of your report where you have Tablix or Matrix component with few groups. Or you go to one of my previous posts where you can download sample grouped report.

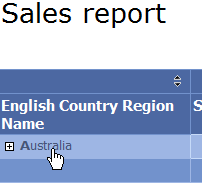
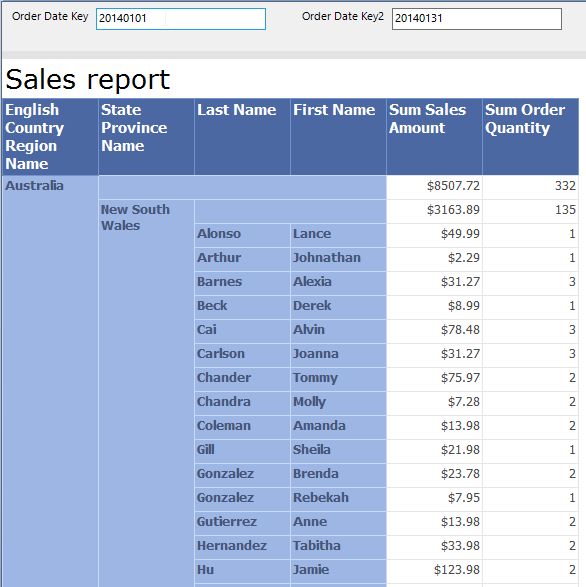
Lets have report or similar report as on picture bellow. So we have groups and detail data and our task is to prepare user view per Region Name by default with posibility to go to data on lower group level. In short we have to do 2 steps:

  1. Create toggle item in Tablix, which allow user to do Expand/Collapse action
  2. Hide groups at lower level of group hierarchy to see only Region Name when runing report by default

Lets have report or similar report as on picture bellow.

Sales report
Picture 1 Sales report

To set toggle item, click on group from which you would like to Expand/Collapse data. As you see on picture bellow, we would like to toggle EnglishCountryRegionName, so we have to go to StateProvinceName group property and there set toggle item. It is important that toggle item is textbox outside of the group we would like to Expand/Collapse (otherwise SSRS displays an error when rendering).

Tablix Toggle item
Picture 2 Tablix Toggle item

Right click on StateProvinceName group in Grouping pane and Properties from popup menu.

 Grouping Pane
Picture 3 Grouping Pane

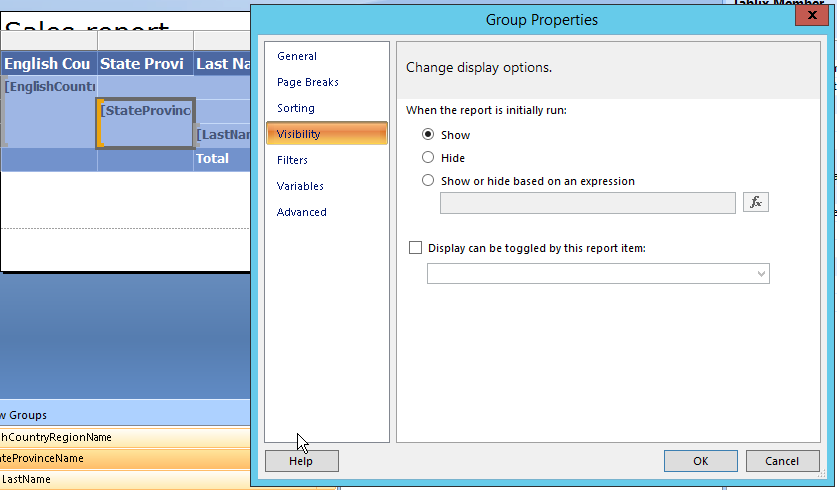
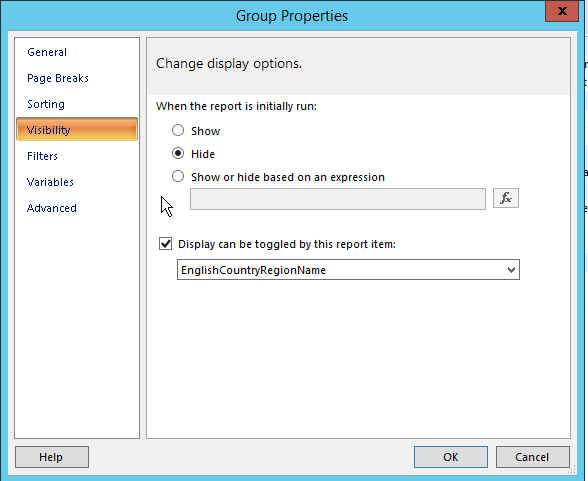
Go to Visibility tab in Group Properties dialog and here we check Display can be toggled by this report item.

Group Visibility
Picture 4 Group Visibility

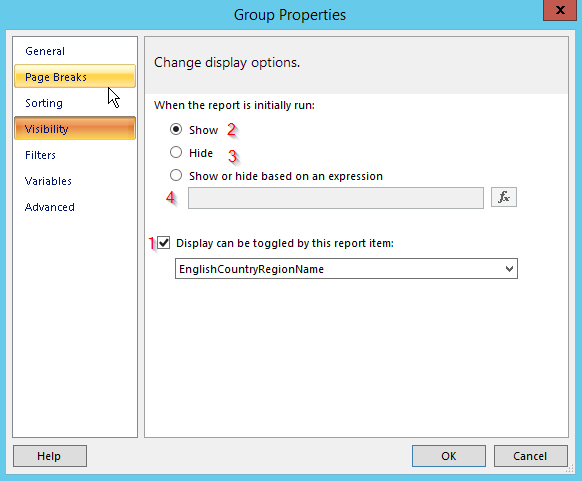
On picture bellow there are shown possible options you can set when managing Expand/Collapse functionality.

  1. For Expand/Collapse lets define toggle item. From select box lists EnlishCountryRegionName, it is text box we will use for Expand/Collapse functionality.
  2. Show – if we would like to have group expanded by default let’s leave it checked
  3. Hide – hides group by default.
  4. Show or hide based on an expression – I will explain in more detail in next posts.
Group Properties - Group visibility
Picture 5 Group Properties – Group visibility

For our scenario, Group Property dialog should look as on picture bellow. Check Hide, check Display can be toggled by this report item and select Report Item.

Group Properties
Picture 6 Group Properties

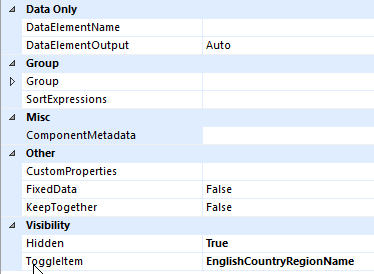
Group visibility and toggle item can be set also through Properties

Pane as shown on picture below. Click on Grouping Pane on StateProvinceName group. In Properties Pane set properties in Visibility section, Hidden and ToggleItem.

Properties Pane
Picture 7 Properties Pane

TIP: toggle item sign has “+” character by default. If you would like to change it go to your report item, which you set as toggle. In our case it is textbox EnglishCountryRegionName in the Tablix. In Properties

Pane you can change the default initial state sign trough InitialToggleState property.

Properties Pane Visibility
Picture 8 Properties Pane Visibility

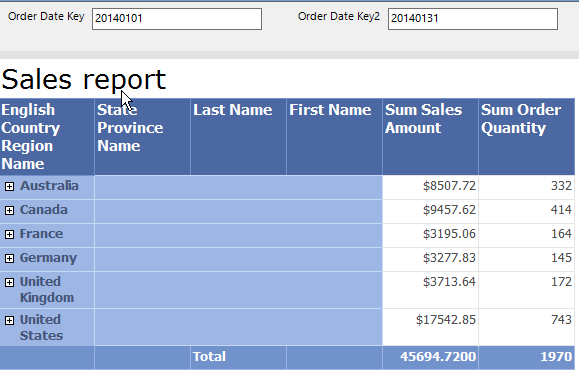
Finally, you should get your Tablix design looks like on the report bellow. Data are collapsed at Region name level. User can go the detail by expand toggle item situated on the left side of the report.

Sales report Collapsed
Picture 9 Sales report Collapsed

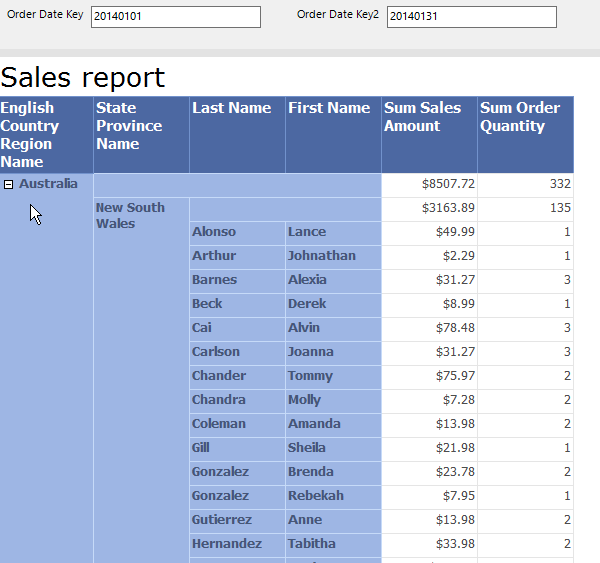
After clicking on Australia item you expand all data hidden under Australia region group.

Sales report Expanded
Picture 10 Sales report Expanded

In next post we extend our solution by parametrized Collapse/Expand group.