Expand, collapse functionality is nice feature of Reporting Services. In this post we use this functionality in connection with Tablix component. Be aware that more SSRS components support this functionality and it is good approach how to make reports and dashboards more user-friendly. It’s also a way how to make top to bottom analysis, since user can get data from totals to details by few clicks.
For practice you can use any of your report where you have Tablix or Matrix component with few groups. Or you go to one of my previous posts where you can download sample grouped report.
Lets have report or similar report as on picture bellow. So we have groups and detail data and our task is to prepare user view per Region Name by default with posibility to go to data on lower group level. In short we have to do 2 steps:
Create toggle item in Tablix, which allow user to do Expand/Collapse action
Hide groups at lower level of group hierarchy to see only Region Name when runing report by default
Lets have report or similar report as on picture bellow.
Picture 1 Sales report
To set toggle item, click on group from which you would like to Expand/Collapse data. As you see on picture bellow, we would like to toggle EnglishCountryRegionName, so we have to go to StateProvinceName group property and there set toggle item. It is important that toggle item is textbox outside of the group we would like to Expand/Collapse (otherwise SSRS displays an error when rendering).
Picture 2 Tablix Toggle item
Right click on StateProvinceName group in Grouping pane and Properties from popup menu.
Picture 3 Grouping Pane
Go to Visibility tab in Group Properties dialog and here we check Display can be toggled by this report item.
Picture 4 Group Visibility
On picture bellow there are shown possible options you can set when managing Expand/Collapse functionality.
For Expand/Collapse lets define toggle item. From select box lists EnlishCountryRegionName, it is text box we will use for Expand/Collapse functionality.
Show – if we would like to have group expanded by default let’s leave it checked
Hide – hides group by default.
Show or hide based on an expression – I will explain in more detail in next posts.
Picture 5 Group Properties – Group visibility
For our scenario, Group Property dialog should look as on picture bellow. Check Hide, check Display can be toggled by this report item and select Report Item.
Picture 6 Group Properties
Group visibility and toggle item can be set also through Properties
Pane as shown on picture below. Click on Grouping Pane on StateProvinceName group. In Properties Pane set properties in Visibility section, Hidden and ToggleItem.
Picture 7 Properties Pane
TIP: toggle item sign has “+” character by default. If you would like to change it go to your report item, which you set as toggle. In our case it is textbox EnglishCountryRegionName in the Tablix. In Properties
Pane you can change the default initial state sign trough InitialToggleState property.
Picture 8 Properties Pane Visibility
Finally, you should get your Tablix design looks like on the report bellow. Data are collapsed at Region name level. User can go the detail by expand toggle item situated on the left side of the report.
Picture 9 Sales report Collapsed
After clicking on Australia item you expand all data hidden under Australia region group.
Picture 10 Sales report Expanded
In next post we extend our solution by parametrized Collapse/Expand group.
With Reporting Services is number formatting so easy. You can continue with our series and get report from here, or just open your report and follow bellow instructions. There are 2 basic places in designer surface where to format figures in your report Tablix.
Through Tablix Text Box Properties
Properties Pane
Tip: if you would like to format more text boxes in Tablix you can do it in few ways.
Select text boxes you would like to format by clicking mouse cursor holding Left shift and change formatting in Properties Pane. (this will work in case that all text boxes would have the same formatting, if one text box format differs from others you will not be allowed to change the format).
You can change formatting in one text box and by copy paste action to other textboxes, formats are transferred.
Download report and open it in a texts editor and replace formatting tags
Let’s look on the report we created in post SSRS Tablix – repeating header. We would like to format Sum Sales Amount column with currency.
Picture 1 Sales Report
Go to text box with Sum Sales Amount value. Choose for example the one from EnglishCountryName group, right click and select Text Box Properties from popup menu.
Picture 2 Textbox Properties
Text Box Properties window is opened, and you can set Currency formatting options. Click on Currency category and choose format you would like to apply. On picture bellow you can see that you have many options to set currency format: how many decimal places, if use 1000 separator, how to display negative numbers which currency symbol to display and where, etc. Regional setting of machine where Reporting Services are installed has impact on default settings in Text Box Properties window. Reporting Services supports regional formatting in different regional environments. For our report I left the default English settings.
Picture 3 Textbox Properties – Number currency format
After formatting the rest of text boxes with Sum Sales Amount you can see formatted report bellow.
Picture 4 Sales report – currency format
In Properties Pane, Number section, Format property you can find currency formatting we set.
Picture 5 Properties Pane – Number format
In other posts I will describe other scenarios and approaches to format data in reports.
I write about Reporting Services which was installed in native mode. The second one, SharePoint mode will be mentioned in future posts. When you perform simple installation as local instance on your serve or on your computer, you should be aware of 2 importing things to start your work with Reporting Services.
Is my reporting instance running?
On which URL address can I access published reports?
There is other stuff to check, but I think these two are the most important. There is configuration tool named Reporting Services Configuration Manager, where you find basic info regarding Reporting Services configuration such name and destination of Reporting Services database, service account under which is reporting service running, very useful info regarding report manager and report server URL (I never can’t remember) etc.
Let’s check that Reporting Service is already running
Click on Reporting Services Configuration Manager, you find it obviously in location: Start Menu\Programs\Microsoft SQL Server\Configuration Tools. When Reporting Services Configuration Manager appears, there are menu items on the left side, linked to correspondent sections you need to configure. There is Server instance item at the top of the menu, by click on it you get Report Server status and basic information. Name and ID of the instance, information regarding edition and product version. Name of configured Report Server Database, weather instance is running in native or SharePoint mode and finally report service status.
Here is the point you can easily check if your report server is running or not. You can start or stop it from this window too. Other approach to handle Reporting Services is from \Programs\Administrative Tools\Services.
Picture 1 report server status
Where can I find my published reports
In Report Manager URL, there is an URL address to Report Manager web application defined. Do not mix Report manager URL with Report Server URL. Report Manager is web application through which you can visually manage reports, data sources, subscriptions, users’ access, etc. Report Manager is visual web interface for report publishing management. In comparation with Report Server URL, this application has user interface you can manage mentioned operations. The URL is obviously in following shape: <Server Name>/<Reports>. You can set URL through installation or you can change it later in the Configuration Manager. You can also click on Advanced option to change port of Report Manger service, 80 is set by default.
Picture 2 Report Manager URL
Under which service is my reporting services running
In the Service Account section, you can configure account under which will Report Server service run. You can select whether to use Local, Network, System or Domain account. Since 2017 you can also use Virtual account which is recommended if you don’t have Domain user account. Primary it is recommended to use domain account instead of the Network service account from security reasons. Local accounts have some limitations you have to considered when you are configuring report server. Generally, you should consider whether your Report server connects to remote Report Server database or you will use subscription, or you will access files as data sources placed somewhere on network, etc.
Picture 3 Service Account
Report Server
Report Server is the core of Reporting Services. It consists of several components handling processing, rendering and publishing of reports and possibility to implement extensions in authentication, data processing, report rendering and publishing. It does not have user-interface, but it allows you to access mentioned components programmatically. You can list the report repository with your internet explorer. The default URL of Report Server is follows: <Server name>/<ReportServer>, 80 port by default. If you would like to access web service methods of Report Server you can get them by its web service end-points. You can connect it through web-service URL in shape: <Server name>/<ReportServer/ReportServiceXXXX.asmx (Server/ReportServer/ReportService2005.asmx). In next posts I will write regarding this feature in more detail since it could automate work for administrators.
Picture 4 Web Service URL
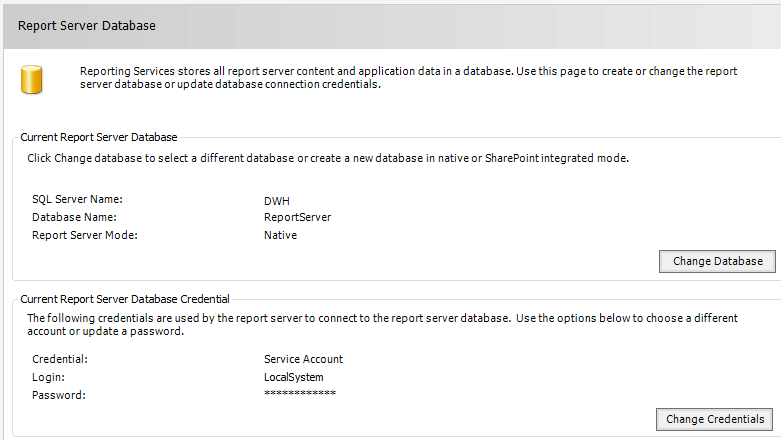
Report Server Database
Report Server Database consists of reports metadata, report repository data, report objects, log data regarding report processing, users access etc. There are two databases installed, one for temporary data and primary one as the main data storage. Due to installation you can leave default settings of Report Server databases which are installed locally, or you can choose manual installation and select different Report Server databases destination, for example on remote machine. Here in the Configuration Manager you can change the database after Reporting Services installation. There is also a possibility to set credentials used by Report Server to connect to the report server database.
Picture 5 Report Server Database
Scale-out Deployment
This Configuration Manager option will be described in very short. I will try to come to describe them in later posts since they are not so important for the basic installation.
Scale-out Deployment gives you possibility to share one Report Server Database with more Report Servers or to implement solution with load balancer. The detail info is described on the Microsoft website: https://bit.ly/30eFHTY
Picture 6 Scale-out Deployment
Encryption Keys management
Report Server Database stores sensitive data which are encrypted by a symmetric key. You should create and backup encryption key immediately after installation of Reporting Services is done as it is important part in case you would reuse Report Server Database. In one of my future post I will go through Report Server Database recovery and this functionality will be described in more detail. There are other scenarios such creating new installation of Reporting Services with existing Report Server Database, moving instances of Reporting Services, renaming the instance where hosting Report Server, resetting password for account Reporting Services is running etc. You can find more info on website https://bit.ly/2w6EJeJ.
Picture 7 Encryption Keys
E-mail Settings
Reporting Services supports report distribution by email. It can be configured in two ways. In the Report Server configuration file RSReportServer.config you find in your installation directory of Reporting Services. This will be described in one of my future posts. In this file you can set advanced email delivery parameters. The fundamental step to make this feature functional is to go to Configuration Manager, Email Settings section, set your SMPT server address and email account sending email from the SMTP server. As on Microsoft website states The Report Server service account must have permission on the SMTP server to send mail. You can find More info on https://bit.ly/2OO0iZl. I will pay attention to Report Server subscription using email delivery in separate post.